
Page 75 - 2024 Poultry Digital Catalog
P. 75
It’sa Complete Gate!
It quickly installs
at the ends of existing garden
or poultry nets.
PoultryNet® Gates Enter and exit your poultry pens with a fast, one-handed operation.
Attaches to electric netting to keep poultry in and predators out. Gates must be electrified (see energizers on pp. 68–72). Works with 42" or 48" nets.
PoultryNet Gate (DP) black/white net, black posts 4' x 48", 5 lb .................................#340605 $60.00 8' x 48", 6 lb.................................#340607 $71.00
PoultryNet Gate (DP) green/black net, white posts 4' x 48", 5 lb .................................#340622 $60.00 8' x 48", 6 lb.................................#340623 $71.00
Electrified netting, pp. 62–67 Energizers, pp. 68–72
PowerLinkTM 4.0
If placing a gate between two
rolls of net: Connect the static end of the gate to the fence supplying the power. Use a PowerLink to carry power from the handle end
of the gate to the second roll. Unclip to disconnect power. Stainless steel jaws.
PowerLinks
30" cord, 0.20 lb......................... #335500 48" cord, 0.20 lb......................... #335505
$5.00 $5.00
TIP: ELECTRIFIED SECURITY
• Poultry gates must be electrified in order to effectively deter predators and contain poultry or livestock (see energizers on pp. 68–72). It is not a physical barrier.
• Stainless steel clips at each end of the gate provide electrical connections to the fence.
• End posts are drivable (DP) for dry, hard or rocky soils. Insert with a dead blow hammer (p. 73).
CA residents see p. 3 for Prop 65 Warning.
Install Electric Fence
Site preparation
• Carry netting to proposed fence line.
• Keep vegetation 4" or less. If mowing isn’t practical, drive over or trample grass to make a track. Then install the fence in the path.
• For longer fences we put the rolls into a vehicle and unload them as we drive along the intended fence line.
Common errors
1. Not energizing the net or using an energizer too small in joules of output. (Ignore “miles” claims.) Failure is almost guaranteed if net is not energized properly.
2. Rolling net like a carpet instead of first folding it by the posts. If you do this, you’re guaranteed to hate the fence as it creates a mess of tangles. Most unhappy users roll the net like a carpet instead of folding—our instructions are quite specific about this, “Don’t do it!” (See more on p. 79).
in Minutes!
Quick to Install • Adaptable • Durable
Why it’s easy to install
Even for new users, it can take less than 10 minutes take a roll of net out-of-the-box to an installed fence. We can understand why those without experience might doubt those who say “it’s very easy.”
But netting is a product that’s easy to use—if you follow the instructions included with each net.
A key to its ease and speed is that netting needs minimal tension—which means light posts (pre-built into net) that are both easy to carry and easy to push or step into the soil.
HOW TO
INSTALL NETTING
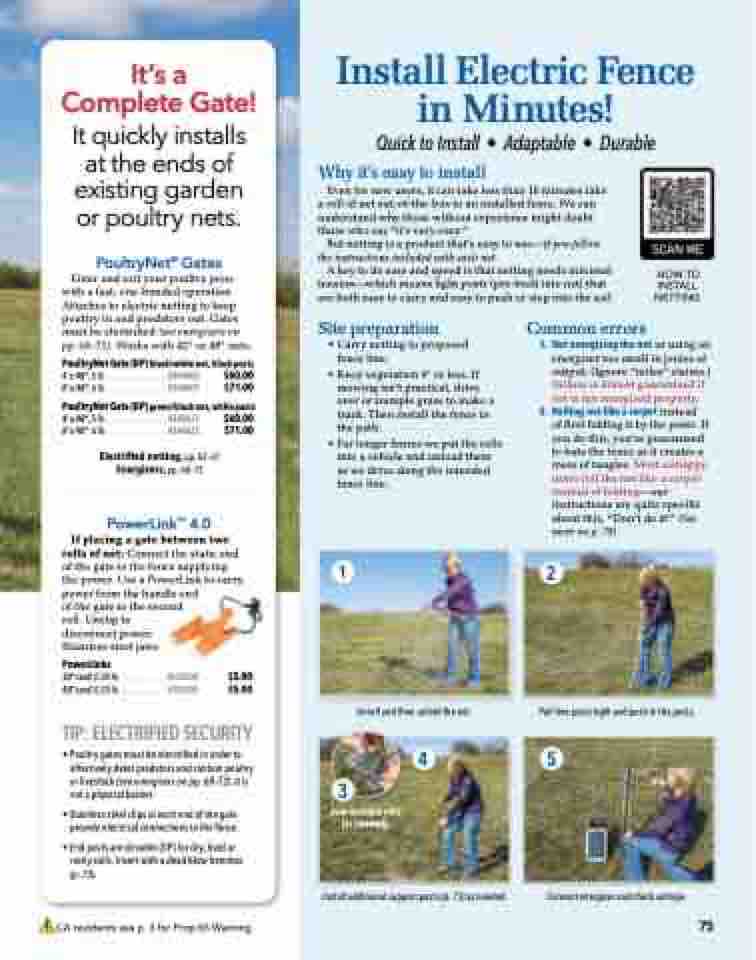
1
2
Unroll and then unfold the net.
Pull line posts tight and push in the posts.
3
Join multiple rolls (as needed).
Install additional support posts (p. 73) as needed.
Connect energizer and check voltage.
4
5
75
